Colcannon is a hearty Irish dish that combines kale (or cabbage) with mashed potatoes. There are four main ingredients in Colcannon; potatoes, kale, milk and butter. The dish should be served with extra pats of butter on top so that they melt over the Colcannon while it is being served. Ok, so this is not one of my healthier dishes but even my keto loving husband had to stick a fork in the Colcannon after I made it. The white potatoes mixed with the green kale and melted butter on top is quite irresistible. It is absolutely delicious to grab a forkful of the potatoes and kale and dip it in the melted butter. If you serve colcannon in individual portions it makes it even easier to achieve this experience. Try serving the Colcannon in individual ramekins with a pat of butter on top.
What should I serve with the Colcannon?
Typically Colcannon is served with ham, sausages or corned beef. It would also make a nice side dish with stew. If you’re looking to keep the main dish a little lighter then broiled salmon with a lemon sauce would work well.
Tips for making great mashed potatoes:
You must dry the potatoes after you boil them and before you mash them. When the potatoes are tender drain the water and put the potatoes back into the pot over a low flame to remove excess water. Stir the potatoes over the heat for a few minutes to dry them out. This step will insure that you you have fluffy, light mashed potatoes. If your mashed potatoes are dense and gummy it’s because there was too much water left in the potatoes.
Return the potatoes to the pot after draining the water. Stir over low heat to remove excess water before mashing potatoes.
Tender Beef with Carrots and Peas Topped with Puff Pastry
Beef Stew Topped with Puff Pastry
On a cold winter day I absolutely love to make a big pot of stew. You need to take your time with stew, it is not something that you can rush. The good news is that beef stew tastes great for several days so you can make it when you have some free time and then refrigerate it for another day. You can also freeze the stew for two months so it is the ideal dish to prepare and freeze in portions.
I take the beef stew up a notch by serving it in individual tureens that are each topped with golden puff pastry. It adds such a nice touch to beef stew. I think that serving beef stew this way makes it perfect to serve on a regular night or for a holiday. Make the stew the day before and then warm it up, put it in individual oven safe tureen bowls, top with puff pastry and bake in the oven for 15 minutes. I like to make mashed potatoes on the side. Some people like to eat the beef stew out of the tureen, others spoon the beef stew over the mashed potatoes. The combination of the buttery puff pastry and the tender beef with gravy is simply delicious. It will warm you up from the inside. There is something special about slow cooked beef stew.
Just out of the oven. These beauties are ready to be served.
Please note that it is not mandatory that you serve the stew in individual tureens topped with puff pastry. The stew is delicious served without the puff pastry as well. The puff pastry just makes it a little more special. I also intentionally do not put potatoes in my beef stew because I like to serve it with mashed potatoes or buttered noodles on the side but you can absolutely add some cubed potatoes to the stew when you add the carrots if you prefer to serve a one-pot meal. I would recommend peeled and cubed yukon gold potatoes. The carrots and peas add such beautiful color to the velvety brown gravy. The addition of Dijon mustard to the stew creates a little spice and another layer of flavor. You will notice in some beef stew recipes they add vinegar, the Dijon mustard is a replacement The tangy spice of the Dijon mustard adds depth of flavor to the beef stew. As always, you can email me with any questions and I will be happy to answer them. You can also comment below.
Beef Stew with Carrots and Peas Topped with Puff Pastry
Prep Time20 minutesmins
Cook Time2 hourshrs45 minutesmins
Total Time3 hourshrs5 minutesmins
Course: Main Course
Cuisine: American
Keyword: meat, beef stew, pot pie
Servings: 6people
Ingredients
4tbspvegetable oil
¼cupflour
1¼lbstewing meat
2tbsptomato paste
1cupchopped onions
1cupred wine
5carrotspeeled and cut in ¼ inch rounds
1cuppeasfrozen is ok
2cupsbeef broth
1¼cupwater
½tbspdijon mustard
2tbspcornstarchmixed with ¼ cup water
1tspthymeleaves only, no stem
3dried bay leaves
1tspsalt
1tsppepper
1½sheetpuff pastry
1eggmixed with 2 tbsp water
Instructions
dredge meat in flour
heat 2 tbsp oil in heavy bottom pot
sear meat in batches, adding more oil as needed and place beef on side
saute onion in pot for 3 minutes until translucent
deglaze with red wine
add beef broth and water
add tomato paste, thyme, salt and pepper
put beef back into pot
add bay leaves
mix cornstarch with ¼ cup water and add to pot
add dijon mustard
bring to boil then reduce heat to simmer and cover
simmer for 45 minutes then skim fat off top
cover and simmer for another hour
add carrots and simmer for 30 minutes
add peas and simmer for another 15 minutes until beef is fork tender
you may need to simmer for an extra 15 minutes, you want the meat to be tender when pierced with a fork
remove bay leaves and spoon stew into individual tureens
roll puff pastry a little and cut out rounds that are just bigger then top of tureens
place puff pastry on each tureen and press to seal, cut a small slit on top to release steam, brush with egg wash and place on baking sheet
bake on middle rack at 400 for 15 minutes until golden brown
Notes
You do not have to serve the stew in individual tureens, you can simply skip that step and serve the soup without the puff pastry on top. This will save time and the stew will be delicious. Serve with mashed potatoes or buttered noodles.
The key to success is delicious food that you are able to sit and enjoy with your guests.
My Dad turned 84 this week and I decided to host a small dinner for him at my apartment. We usually travel or go out to a restaurant for his birthday but given the times we decided it would be best to dine at home. My Dad loves his birthday so it was important to me to pick a special menu to serve for the occasion. Preparation and timing are the two most important factors in hosting a great dinner party. You want to be able to enjoy the dinner not only prepare it. It is also very uncomfortable for your guests if you keep getting up and look like you are working too hard. It is essential to choose a menu that can be prepped ahead of time. I chose to serve Fresh Perigord Black Truffles Shaved Over Pasta as the appetizer followed by Chorizo and Panko Crusted Black Cod with Beurre Blanc served with Individual Potato Gratin, Spinach Rounds and Blistered Tomatoes. The potato gratin was made 2 hours ahead of time and covered with foil so I could reheat them in the same oven as the fish. The spinach rounds were prepped in the morning and kept in the refrigerator. The Beurre Blanc was made an hour before guests arrived. The sauce was served room temperature.
So let’s sum this up: During the day, The fish was topped with the Panko and Chorizo and put on a baking sheet in the refrigerator, the Spinach Rounds were prepped and put on a baking sheet in the refrigerator and the Potato Gratin was fully cooked and left at room temperature covered with foil. The tomatoes were tossed in Olive Oil and sautéed for 5 minutes while I was making the pasta. The Black Cod, Spinach and Potatoes all required 12 minutes in a 400 oven. When the appetizer was served I put the Black Cod on the top shelf in the oven, the spinach on the middle shelf and the potatoes on the bottom shelf. I then went to sit down and eat my appetizer with my guests. After 10 minutes I returned to the kitchen to take everything out of the oven. The plates were all stacked and ready for me to place the food on. As my kids cleared the appetizer dishes, I plated the food and it was served to the guests. After that I was able to sit, have a glass of wine and enjoy my Dad’s birthday. Dessert was brought by my Step Mom so the rest was easy. I had the dessert plates and forks ready to go. The other nice thing about preparing in advance is that it makes clean up very easy. All that was needed to get done was place the plates and silverware into the dishwasher. No one wants to walk into a messy kitchen at the end of the night…
Appetizer:
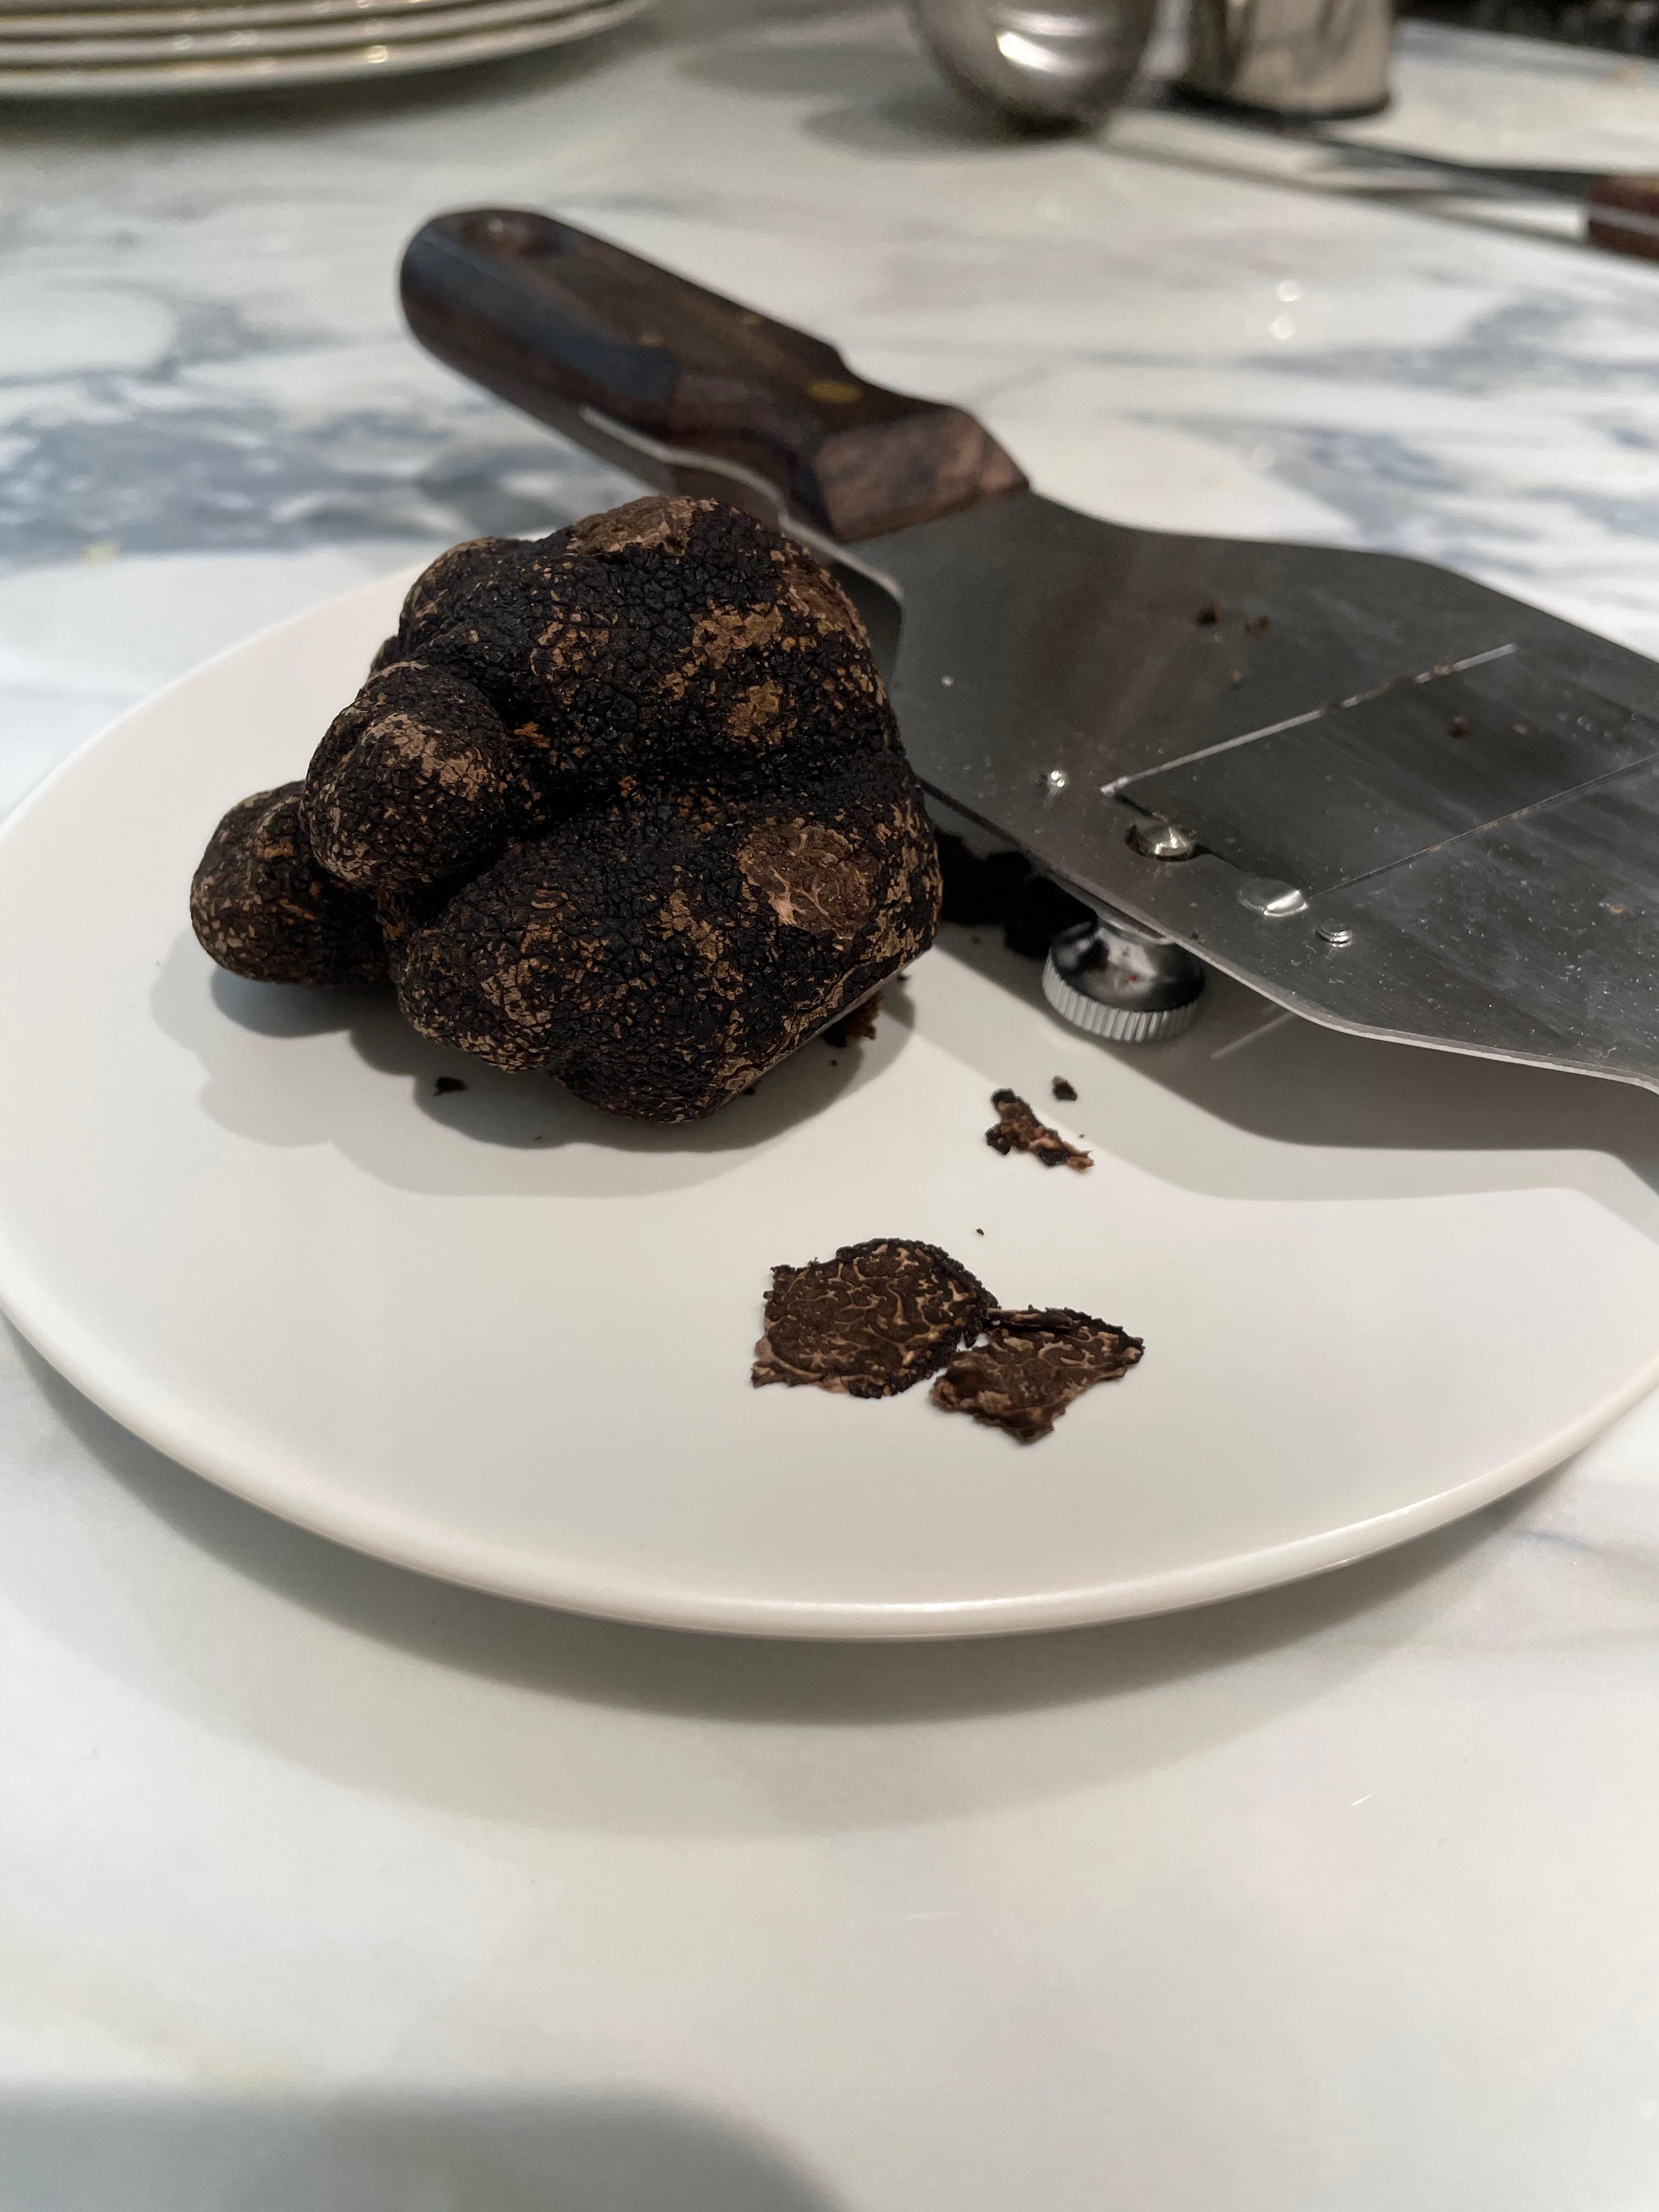
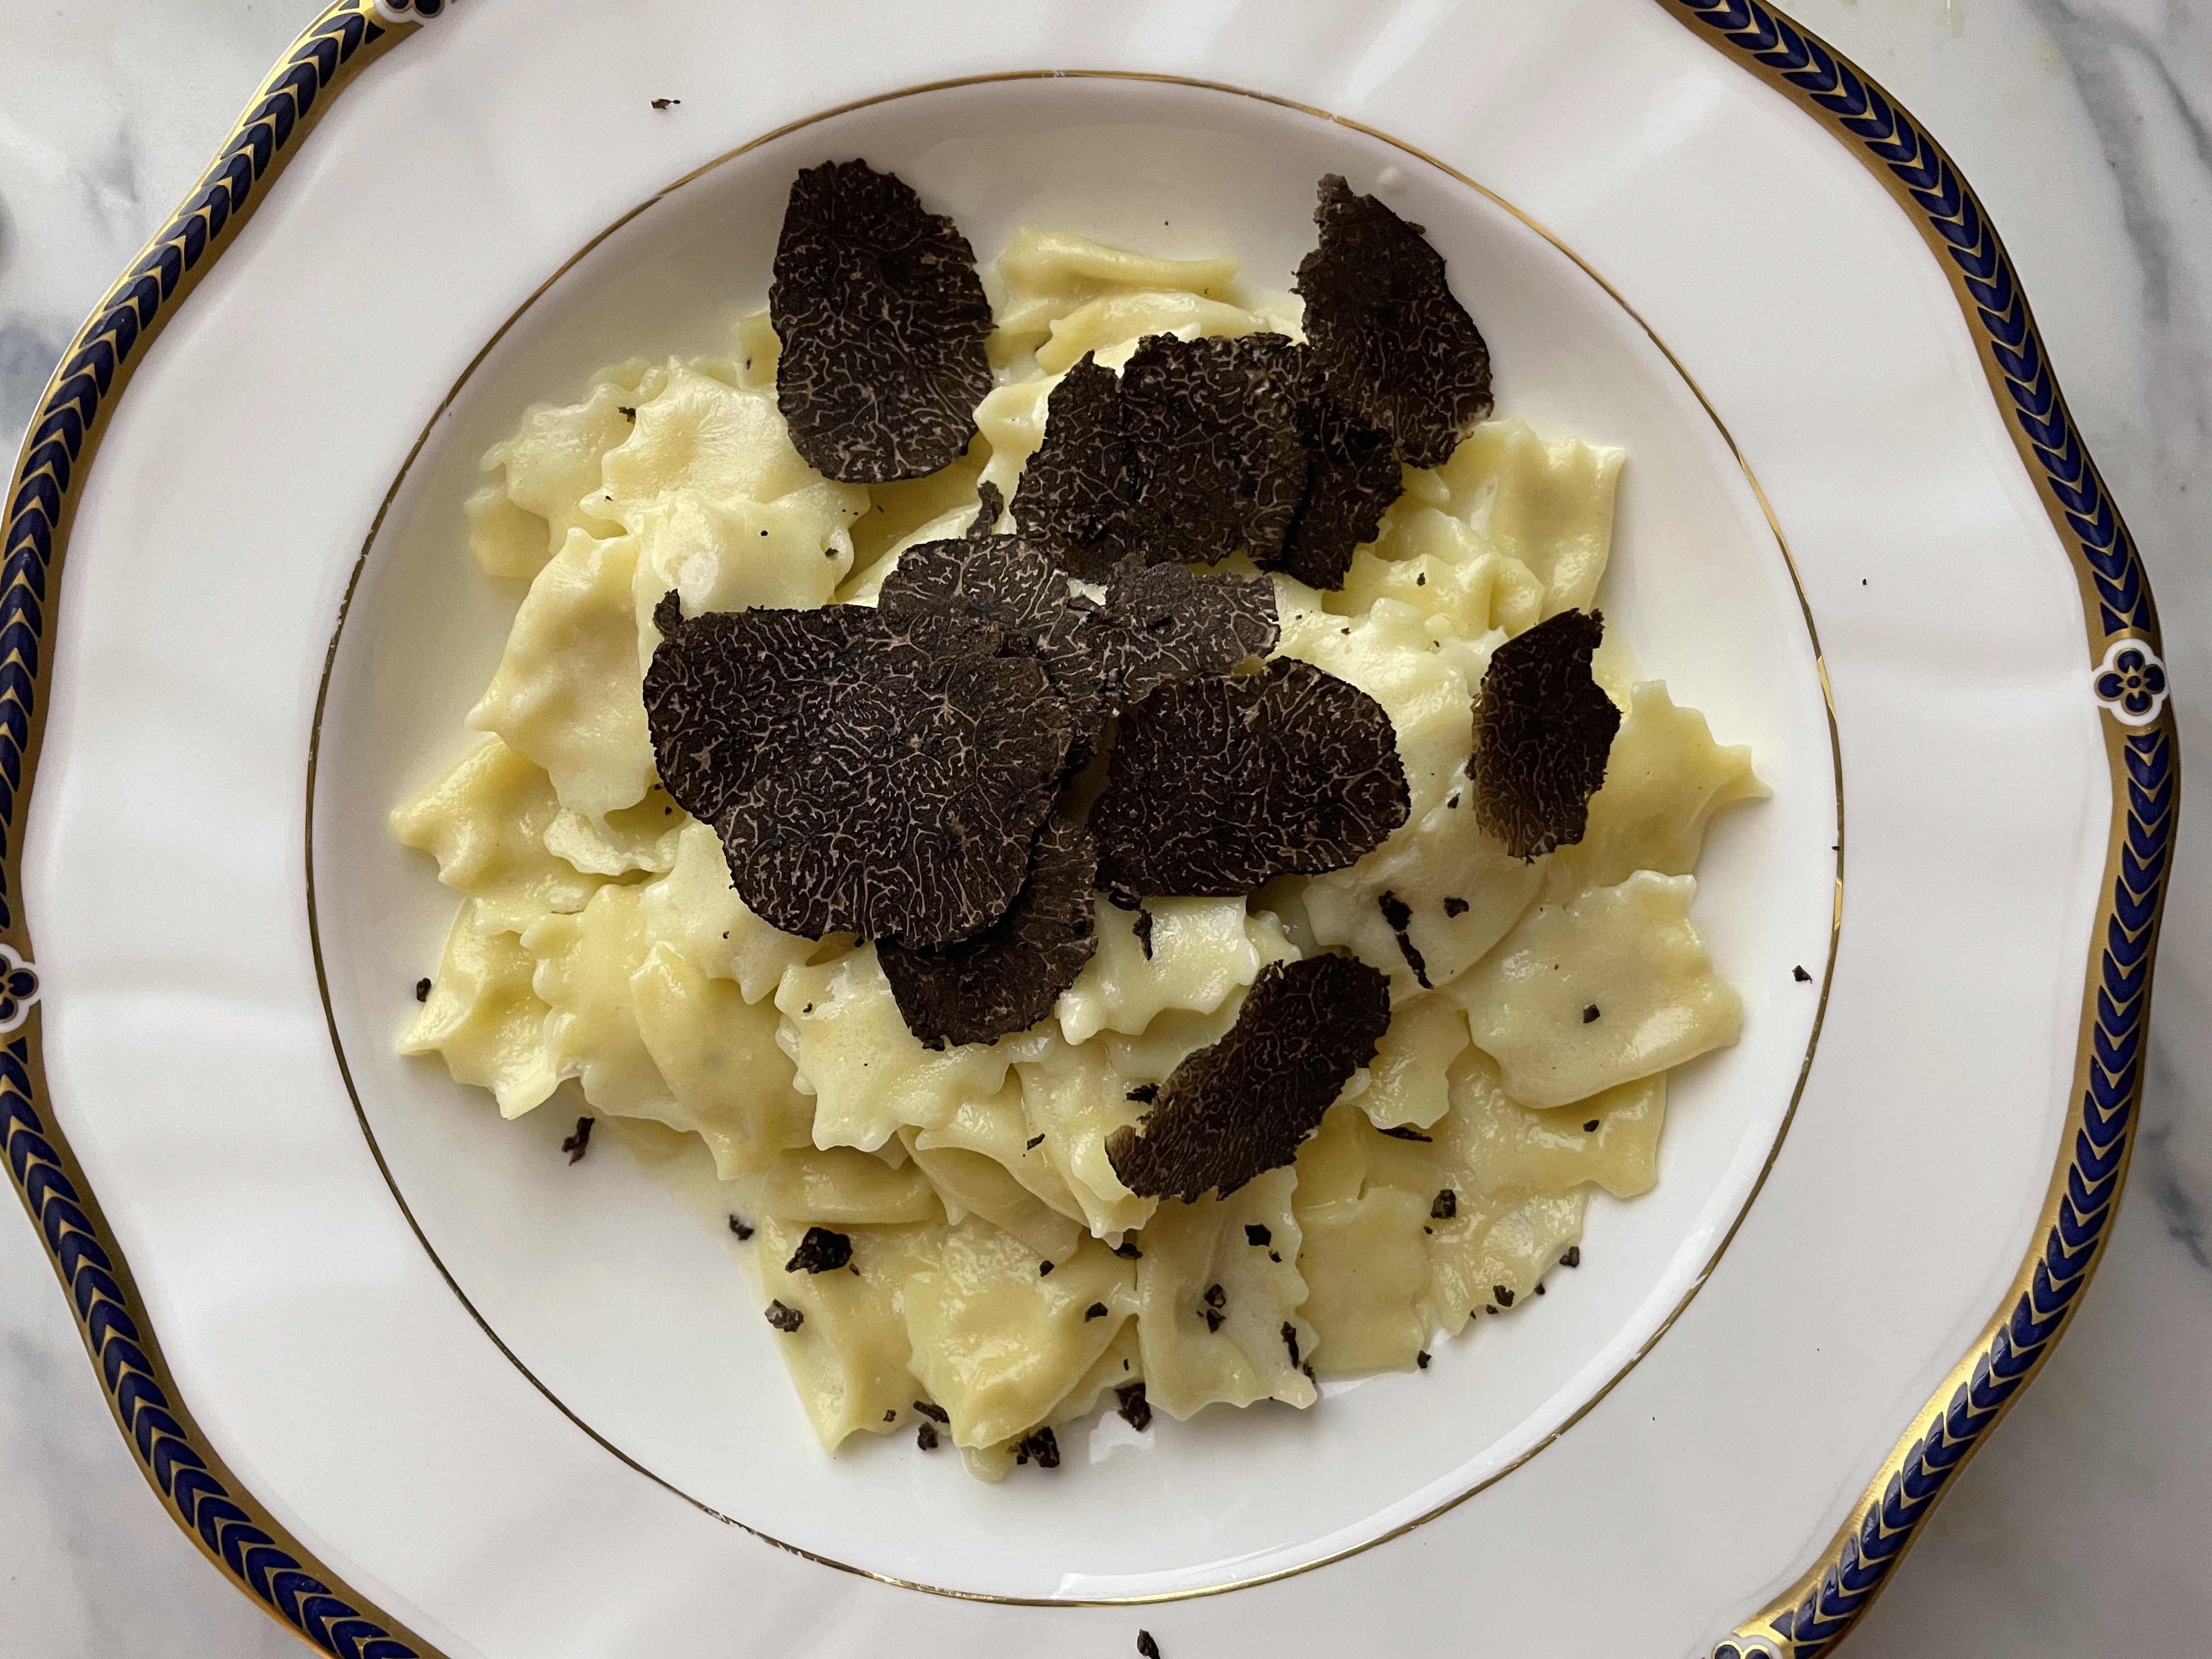
We started with Cacio e Pepe Ravioli in a Truffle Butter and Cream Sauce topped with Shaved Fresh Black Perigord Truffles. Black Perigord Truffles are found in the Winter months, November through March. In the next few days I will be posting more on Black Truffles. The appetizer pasta was very quick to make. The Cacio e Pepe Ravioli was fresh so it only took a few minutes to cook in boiling water. I had a big pot of salted water simmering on the stove when my guests arrived so all I had to do was turn up the heat and make a quick Truffle Cream Sauce when it was time for dinner. The sauce took 5 minutes to make, roughly the same amount of time it took the pasta. I quickly tossed the ravioli in the sauce, dished it into bowls and my daughter Olivia brought them to the table as people were sitting down. I then went around the table and shaved the fresh Black Perigord Truffle over the pasta. It makes a beautiful presentation to shave the Black Truffle at the table.
Entree:
Try to pick a menu that is easy for you. The sides should definitely be made earlier in the day. Many vegetables are able to serve room temperature after being prepared. Try roasting zucchini, yellow squash and tomatoes or sautéing string beans in shallots and serving them room temperature or give them a bit of heat in the oven before serving. Individual Potato Gratin can be made earlier in the day and quickly reheated. Fish is ready in no time which is why I love this Black Cod recipe. It is ready in 15 minutes and looks absolutely beautiful on a plate.
An elegant appetizer that is easy to make and tastes great
I love appetizers that are interesting but easy to prepare. I love serving soup or salad to start but sometimes I want something a little different so this parmesan flan makes a great alternative. When I invite friends over there are usually some dietary requirements that need to be taken into consideration when choosing a menu to serve. This parmesan flan recipe is easy to prepare and can be adapted to fit many diets. If you would like to keep it vegetarian then serve it with blistered tomatoes, roasted artichoke hearts and arugula. If your guests aren’t vegetarian then I recommend serving the flan with Prosciutto di Parma, Arugula and Blistered Tomatoes. The flans come together very quickly and then need to be baked in ramekins that are placed in a water bath for 20 minutes. To do this you will place the ramekins in a baking dish and then pour boiling water in the baking dish until ramekins are submerged half way in the water. This is a necessary way to make any flan, whether sweet or savory. It insures the the edges do not get burned and that the flan cooks evenly.
I also love the silky texture of flan. It’s almost like a spread and I have seen some of my guests use a knife to put it on a little bread before eating it. Why not? It is like a cheesy spread. The parmesan flavor is dominate in the dish but is softened by the milk and cream. It is essential to grate your own parmesan cheese and not use packaged grated cheese. I prefer Parmigiana Reggiano. Freshly grated cheese is much lighter and airier than packaged grated cheese. I like to grind some additional black pepper over the flan before serving it. I love the way the black pepper looks on top of the creamy white flan.
Should I serve the Parmesan Flan hot or cold?
I like to serve the flan a bit warm. It doesn’t have to be hot but I do not like it cold. You can time it so the flans come out of the oven 30 minutes before your guests arrive. The flan will need to cool for 15 minutes before you invert them onto the plate and add the arugula, blistered tomatoes, basil and prosciutto. You can set the plates aside so the appetizer is ready to serve when your guests arrive.
What else can I serve the Parmesan Flan with?
You can really serve the parmesan flan with a lot of things. Think of it as creamy, silky parmesan. It works well as a side dish too. You can serve it with grilled fish or chicken with some sautéed spinach. It is also delicious next to a sliced sirloin steak or filet mignon. Next time you make an antipasto plate think about making the flan to serve on the board next to the prosciutto and salami.
add whole pealed garlic clove, salt, pepper and nutmeg
warm milk on low flame until hot but not boiling
whisk eggs
slowly add milk mixture to eggs being careful not to cook the eggs
strain through fine sieve
blend in freshly grated parmesan cheese and gently mix until cheese is melted
grease 4 ramekins with spray or butter
fill ramekins 3/4 of the way up
put ramekins in a baking dish and then pour boiling water into baking dish until water is half way up ramekins. Be careful not to get water in flan.
place on baking sheet in oven for 20 minutes until flan is set
remove from oven and remove ramekins from water bath. Allow to rest for 15 minutes then turn ramekin over plate to release flan from ramekin. If it is a little stuck use a knife to gently run around edge of flan to release it from ramekin.
Blistered Tomatoes
Heat olive oil in pan over medium heat
add tomatoes, salt and pepper – Be careful, they wil splatter as they cook
shake tomatoes in pan until starting to brown and soften
Serve Parmesan Flan with Tomatoes, Arugula dressed with balsamic vinegar and olive oil and slices of Prosciutto di Parma (optional)
Living in NYC I love to walk in Central Park and eat a big, hot salty pretzel. Soft pretzels are sold by street vendors all over the city and are best eaten hot with lots of mustard. The pretzel was originally created in Germany by a Monk around 610 A.D. They were called ‘pretiola’ which translates to ‘little reward’. The monk would give the pretiola to children as a reward for learning their prayers. The twisted shape of the pretzel is meant to resemble a child’s arms crossed in prayer.
I have spent a lot of time perfecting a recipe for homemade soft pretzels at home. The dough comes together very quickly but does require a rise of about an hour in order to create a pretzel with the right texture and consistency. I like to make these pretzels with my daughter Olivia. It is a lot of fun to roll out the dough and shape them into pretzels. It is essential to boil the pretzel for 30 seconds in water and baking soda before baking them in the oven. This step is what creates the slightly chewy texture to the soft pretzel and prepares the outside to crisp up in the oven. Please note that you should add the baking soda to the water first and then bring it to a boil. Adding the baking soda to boiling water will cause the water to boil over and will make a mess. Trust me on this one, it’s not pretty. After boiling the pretzels, place them on a parchment lined baking sheet and allow to dry for a few minutes before brushing with egg wash and sprinkling on pretzel salt. You can make the dough into pretzel shape or nuggets, both work well. It is important not to crowd the pretzels when boiling them. I only boil one or two at a time. Also, do not boil them for more than 30 seconds. Boiling the pretzel for too long will alter the taste because of the baking soda. These pretzels are best eaten fresh out of the oven while they are still warm. You will have freshly baked pretzels that are absolutely addicting. You can wrap them in foil and place in an airtight bag in the refrigerator for up to two days. Reheat the pretzels in a 350 oven. They will be good but they will not be as good as when you eat them the same day
Can I top my pretzels with other toppings?
Yes, you can top the pretzels with a variety of toppings, savory and sweet. I like to use pretzel salt on some and everything seasoning on the rest. You need to buy pretzel salt which is a specialized salt. It is not the same as coarse salt. Pretzel salt is white and has less sodium than coarse salt. You can also sprinkle grated Parmigiano-Reggiano cheese on the pretzels when they are almost done baking so that the cheese melts on the pretzel. If you would like to make the pretzels a little sweet I would add a tablespoon of brown sugar to the dough and sprinkle the pretzels with cinnamon and sugar when they are half way through baking. You can serve the sweeter pretzels with chocolate and caramel dipping sauce.
place warm milk, sugar and salt in a mixer fitted with dough hook
slowly add flour and mix
add melted butter and continue to mix until dough comes together
take dough out of bowl and knead on a lightly floured surface until elastic and smooth. about 5 minutes.
place dough in a mixing bowl that has been greased with vegetable oil
rub top of dough with a little oil, cover with a dish towel and place in warm place for 1 hour
preheat oven to 400
add ½ cup baking soda to 9 cups of water and bring to a boil
cut dough into 12 pieces
roll each piece into a long rod around 16 inches long
form into a pretzel shape press ends into pretzel. Or cut into 1 inch nuggets.
Boil one or two at a time for 30 seconds
place on a parchement lines sheet.
Brush with egg wash and sprinkle with pretzel salt or everything seasoning
Bake for 12-14 minutes until golden brown. (8-10 for nuggets)
Notes
You can use active yeast instead of instant yeast. If you use active yeast place the contents of one envelope into the warm milk and allow to activate for 5 minutes. Then proceed with recipe.
I am so excited to share this with you! I have been experimenting with a chocolate bread recipe. I wanted to come up with one that was a combination of brioche and babka. A sweet, but not too sweet, dough layered with just the right amount of semi sweet chocolate. Of course the chocolate bread also had to have a crumb topping. If we are going to go for it well then let’s go for it. I used my cinnamon roll recipe as the base of the dough but added an additional egg yolk, some vanilla extract and a little extra butter. So should we call this Babka, Brioche or Briochka? The dough is softer and fluffier than a typical babka, more like a brioche but it is cut and twisted like a babka so really I guess Briochka is probably the best name.
The result is a buttery, sweet brioche style bread with layers of chocolate running throughout. It’s sweet but not too sweet. The chocolate filling for the babka is made by melting butter and semi sweet chocolate morsels and then mixing in confectionary sugar and cocoa powder to make a chocolate paste. The paste is then spread over the rolled out dough before the dough is rolled. The technique is very similar to cinnamon rolls but we cut the roll in half instead of slices. Each half will fit in one loaf pan. The half is cut vertically and then twisted before being placed in a loaf pan sprayed with baking spray or greased with butter.
How do I prevent gaps in my babka?
No one likes large gaps of air between their layers of babka. There are a few ways to prevent this.
Roll the dough slowly and tightly. Pull the dough slightly back as you roll forward.
Spooning a little half and half over the dough after the second rise will help keep the layers together
Brush top of dough with egg wash before sprinkling on crumb topping
Let bread cool for 15 minutes in pan before you remove babka to cut
Can I Use a Different Filling in the Babka?
Yes, you can fill the dough with several different fillings. Spread Nutella over the dough before rolling or try raspberry jam or cinnamon, butter and brown sugar. You can also add chopped walnuts or raisins if you like. Be creative.
Chocolate babka ready to be baked in oven. Moments away from oh my yum!